- Why Even Bother?
- What Will We Cover?
- Setting Up tsc for Dash
- Inline LSP Support in neovim
- Wrapping up
If you stick with me through this post, here is the setup we will arrive at.
NOTE: You do not need to be a neovim user to benefit from this post. Many of the tips covered below apply equally well to any editor that can take advantage of a JavaScript Language Server.
The code demonstrated in this post is available as a sample Dash project on Github. Everything outside of the neovim injection section assumes that you already have a JavaScript LSP installed and configured for your preferred editor. For neovim, I use ts_ls. For VS C*de, I would bet (some) money that Microsoft’s implementation is installed the moment you open a TypeScript file, or at least that there is a clippy popup along the lines of
Hey there! It looks like you’re trying to edit a TypeScript file! Would you like some help with that?
Anyways, here are the docs just in case. For other editors, you’re own your own, cowboy.
Why Even Bother?
If you work with Plotly’s Dash framework, you’ve probably noticed
that clientside callbacks are treated somewhat as second-class citizens when it comes
to developer tooling. You’ve also likely used (or at least encountered)
dash_ag_grid.
dash-ag-grid adds support for a limited subset of Ag Grid’s functionality via properties in the usual Dash
callback manner. If you are inclined to get fancy with your tables, you will need to make use of dash_ag_grid.getApi,
as demonstrated by this example more-or-less stolen from the forums1:
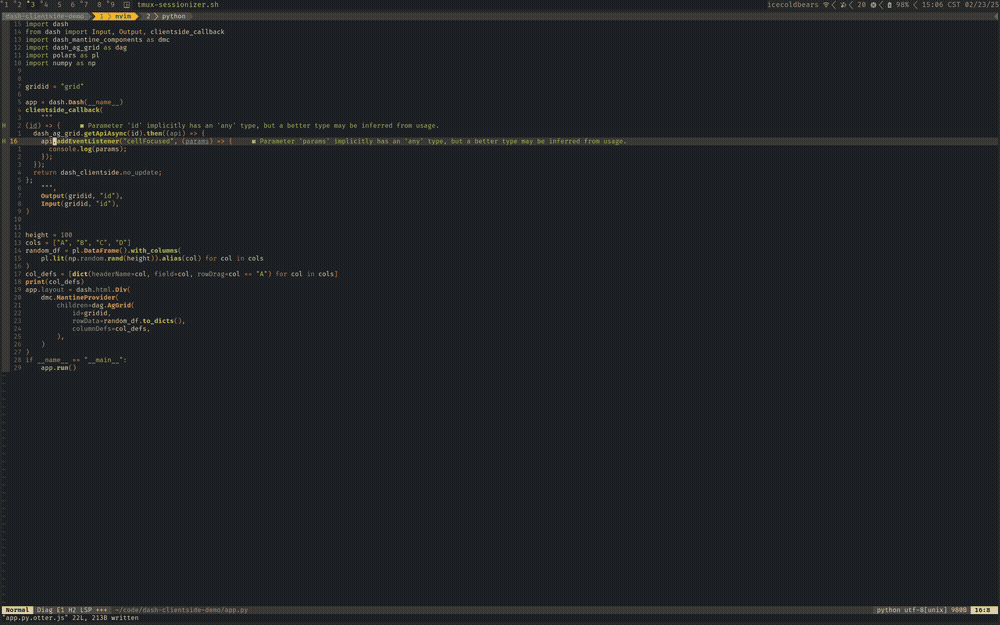
from dash import clientside_callback, Input, Output
gridid = "grid"
clientside_callback(
    """
(id) => {
  dash_ag_grid.getApiAsync(id).then((api) => {
    api.addEventListener("cellFocused", (params) => {
      console.log(params);
    });
  });
  return dash_clientside.no_update;
};
    """,
    Output(gridid, "id"),
    Input(gridid, "id"),
)
With this api object in hand, the developer is now empowered to do just about anything their heart desires to
the Grid. This pattern introduces a few major frustrations:
- There is no type checking in
clientside_callbacks. This is fine for simple stuff, but when working with complex Grid APIs, such checks are very useful. - There is no code completion. The Ag Grid API is large and well-documented. This also means that
searching the docs for your exact use case can take time. If you know what you want to do, but can’t remember
the exact name of the function you’re looking for, having a searchable index of the
GridApiat your fingertips dramatically increases development speed and enjoyability. - You can’t lint or format your JS automatically.
- There is no go to definition, variable renaming, or anything else that LSPs do well.
You can fix some of these issues by including JavaScript in assets/**.js, and using your preferred JavaScript LSP as usual.
As I have discussed before, however, I find that for functions that will only ever be called
from one location, the cognitive overhead of needing to keep track of two very distant locations in
the file tree for what should be local behavior outweighs any benefit you gain
in terms of tooling. Especially now that this post exists :). Plus, it should be possible (I am still working this out)
to get jumping to definition working for members of dagfuncs, for example, which would
also lighten this load.
What Will We Cover?
In the rest of this post, I will assume absolutely zero prior JavaScript tooling experience (I didn’t have much when I set out to figure this out), and explain:
- How to set up tsc to correctly recognize and generate completions for various Dash-isms and imports that are assumed to be globally available.
- How to configure neovim to correctly recognize inline JS, and expose JavaScript language server capabilities from within Python.
Setting Up tsc for Dash
Installation
First, you will need to install npm and tsc.
If you’re on Linux, you can install both through your package manager (e.g. for Arch Linux (btw)).
Node officially recommends using a version manager, so if you’re inclined, you can do that as well.
If you’re on MacOS or Windows, follow the instructions on the npm website, and use $ npm install -g tsc to get TSC installed.
This part is very dependent on your specific operating system and project requirements, so it is likely
worth your time to take a few minutes to read through the linked npm page and consider which method
is most appropriate for you.
Next, in the root directory of your project, install ag-grid-enterprise@31.2.1, prettier and typescript as dev dependencies
with the following command:
$ npm install --save-dev ag-grid-enterprise@31.2.1 prettier typescript
We need to pin Ag Grid to the same version as Dash. If they get around to updating the Dash Ag Grid dependency, you should use that one instead.
Configuring tsc
Next, in our project root directory, we need to create a tsconfig.json file.
For more information, check out the full documentation.
For our use case, I’ve found that the following configuration tends to work pretty well.
{
  "compilerOptions": {
    "alwaysStrict": true,
    "noImplicitReturns": true,
    "emitDecoratorMetadata": true,
    "experimentalDecorators": true,
    "outDir": "dist",
    "removeComments": true,
    "inlineSourceMap": true,
    "importHelpers": true,
    "target": "ESNext",
    "module": "commonjs",
    "allowJs": true,
    "checkJs": true,
    "esModuleInterop": true,
    "skipLibCheck": true,
    "moduleResolution": "node",
    "declaration": true,
    "emitDeclarationOnly": true,
    "declarationMap": true,
    "noImplicitAny": false,
  },
  "exclude": ["node_modules", "env", ".venv", "dist"]
}
A few key options that are worth noting here:
outDirshould be set to something you aren’t already using. If you have an existingdistfolder, pick something else. I also like to put this in.gitignoresince it’s basically just a bunch of metadata, and doesn’t contain useful info about your program.excludeneeds to containnode_modules, the value ofoutDir(in our casedist), and the path to your virtual environment (since Dash packages contain lots of JS files).declarationanddeclarationMapmust betruein order for the next step in this guide to work. Otherwise, our*.d.tsfiles will not produce useful information for our LSP when using features like go to definition.emitDeclarationOnlyshould betrue, since we don’t care about actually emitting JavaScript. Dash handles that for us.noImplicitAny: falseis more a matter of personal preference. If you are using an LSP withclientside_callback, I would recommend keeping this asfalse, as you cannot use JSDoc comments in clientside callbacks (since Dash would try to assign the comment to a variable otherwise).allowJsandcheckJsshould both betrue, otherwise nothing will work outside of any TypeScript you have lying around.
The rest of these I think are a matter of preference, but I haven’t tested this very extensively. Feel free to leave an issue if I’m wrong.
Creating and Emitting Declarations
Now, we need to declare the existence of some globally available functions, since any language servers available to
us don’t know about Dash without being told. We can accomplish this by using a TypeScript declaration file.
The file that I use for working with Dash Ag Grid is very simple.
Simply place the following in assets/index.d.ts:
import { GridApi, } from "ag-grid-enterprise";

declare global {
  namespace dash_ag_grid {
    export function getApi(s: String | Object): GridApi;
    export function getApiAsync(s: String | Object): Promise<GridApi>;
  }
  namespace dash_clientside {
    export const no_update: Object;
  }
  namespace AgGrid {
    export * from "ag-grid-enterprise";
  }
}
- Wrapping everything in a
declare globalblock makes these namespaces available globally. - The
dash_ag_gridnamespace allows us to use the event listener pattern mentioned at the beginning of this article with no hassle. - The
dash_clientsidenamespace exists solely to prevent functions returning ano_updatefrom showing errors. - The
AgGridnamespace allows us to useAgGrid.*in JSDoc Comments, which we will cover in the next section.
Finally, once we have our declaration in assets/, run $ tsc in the root of your Dash project.
If you already have a JavaScript LSP installed, you should now be able to accomplish something like the following:
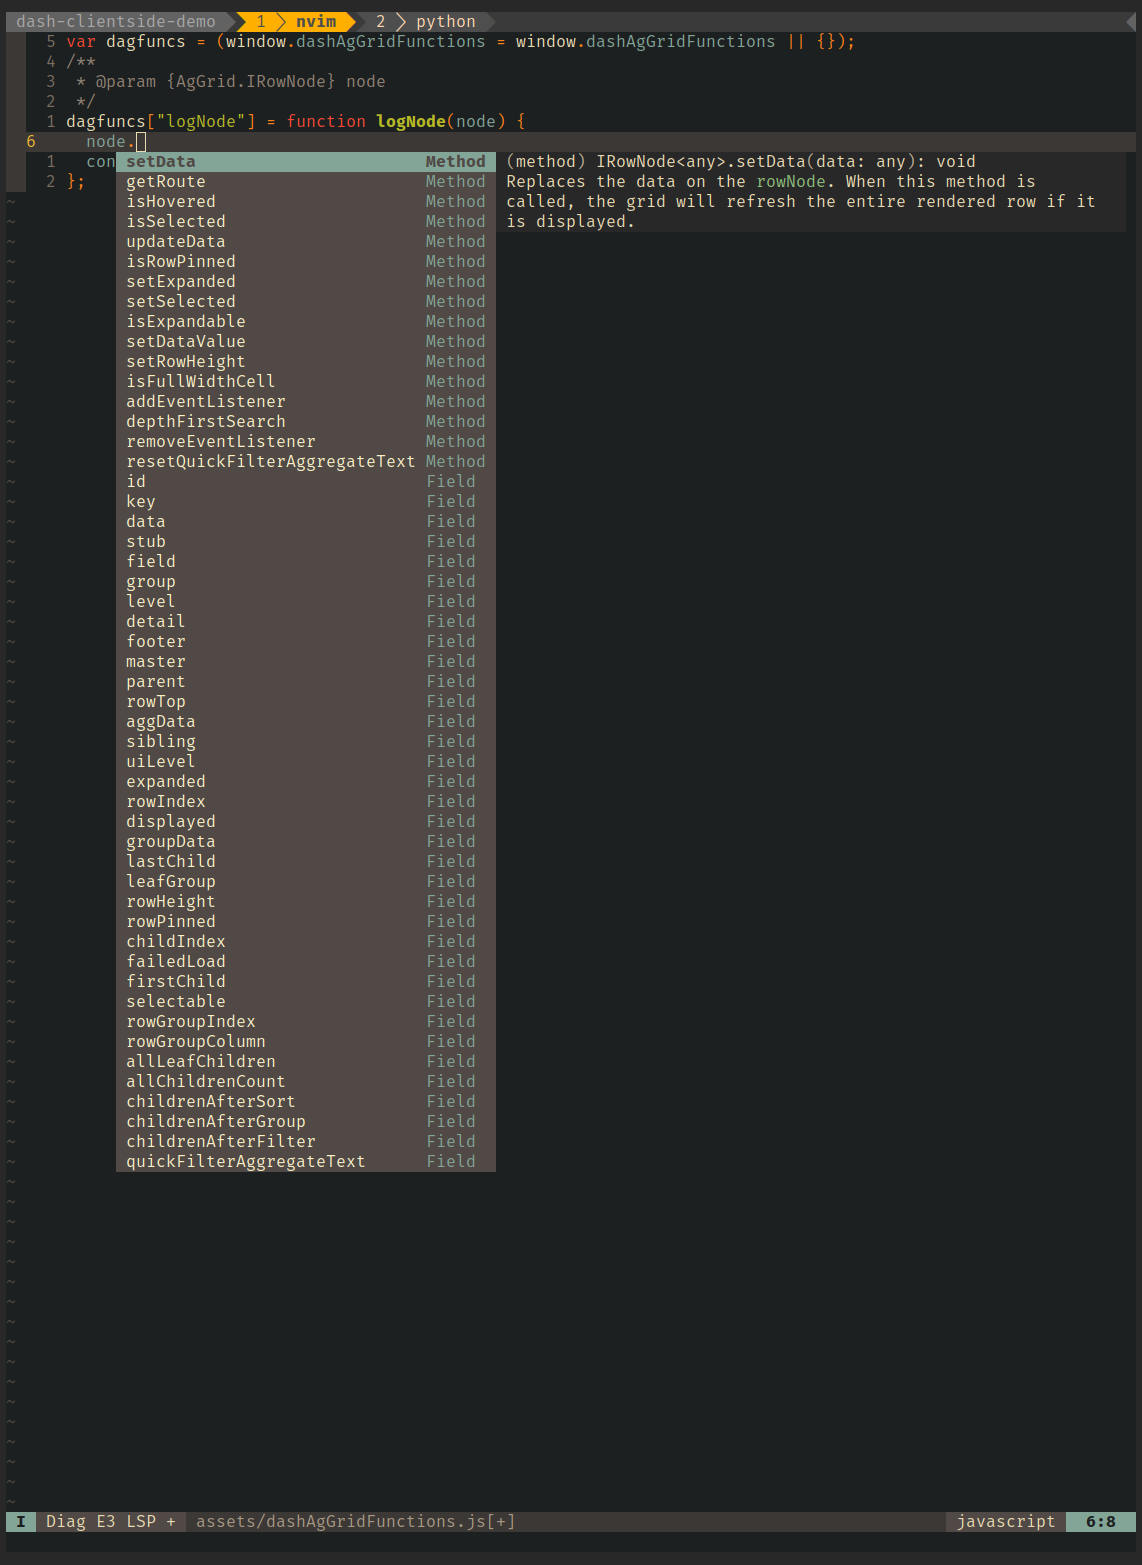
Note the presence of JSDoc comments denoting the types of arguments our function is equipped to accept. We cannot use type hints the same way that we can in Python, as that feature is TypeScript-only and Dash only accepts vanilla JS (afaik). Still, this is a great start! I am still playing around with the declarations and what is/isn’t necessary. Any changes I discover will likely be posted to the demo repository, so make sure to keep an eye out there. Similarly, if you find any other declarations useful, please submit an issue so that I can update this post and the demo repository!
Inline LSP Support in neovim
For the eight developers who are working on large-scale Dash applications in neovim, this section is for you.
My configuration can be found on github.
The relevant files are lua/plugins/conform.lua, lua/plugins/dash.lua, lua/plugins/lsp.lua, and lua/plugins/otter.lua.
I will explain:
- How I use TreeSitter injections to get neovim to recognize inline JavaScript.
- How I got
prettierto run correctly on yourclientside_callbacksusingconform.nvim. - How I use
ts_lswithotter.nvimto correctly map language servers to code blocks as delineated bytreesitter.
The otter bit is still a bit buggy, so I have yet to include this feature in nvim-dash.
It’s also why the linked configuration is on the otter branch, instead of master.
Once I (or someone else) fix(es) the issue linked to this pr, we will be so back!
Using TreeSitter Injections with Dash
I wrote a whole post about getting this working, so give that a read.
I maintain an updated and expanding injections.scm file in a neovim plugin.
You can install it with your preferred package manager with ctdunc/nvim-dash.
Alternately, just copy the injections into your
queries/python/injections.scm.
Formatting Clientside Callbacks with prettier
For all of my formatting needs, I use conform.nvim.
In my config, I have lua/plugins/conform.lua, which should contain at a minumum:
return {
  {
    "stevearc/conform.nvim",
    opts = {
      -- if you use f-strings, this will save you lots of hassle,
      -- as the javascript grammar gets very confused by them.
      notify_on_error = false,
      -- you don't need this, but I like to format on save. Muscle memory I guess.
      format_on_save = function(bufnr)
        -- Disable "format_on_save lsp_fallback" for languages that don't
        -- have a well standardized coding style. You can add additional
        -- languages here or re-enable it for the disabled ones.
        local disable_filetypes = { c = true, cpp = true }
        return {
          timeout_ms = 1000,
          lsp_fallback = not disable_filetypes[vim.bo[bufnr].filetype],
        }
      end,
      formatters_by_ft = {
        python = { "injected" },
        javascript = { "prettier" },
        injected = { ignore_errors = true },
      },
    },
    init = function()
      -- If you want the formatexpr, here is the place to set it
      -- vim.o.formatexpr = "v:lua.require'conform'.formatexpr()"
    end,
  },
}
For python, you should probably put your preferred formatter in front of injected, otherwise, the only
code that conform will format is the inline JavaScript. I use python = { "ruff_format", "ruff_fix", "injected" } because
ruff is wicked fast.
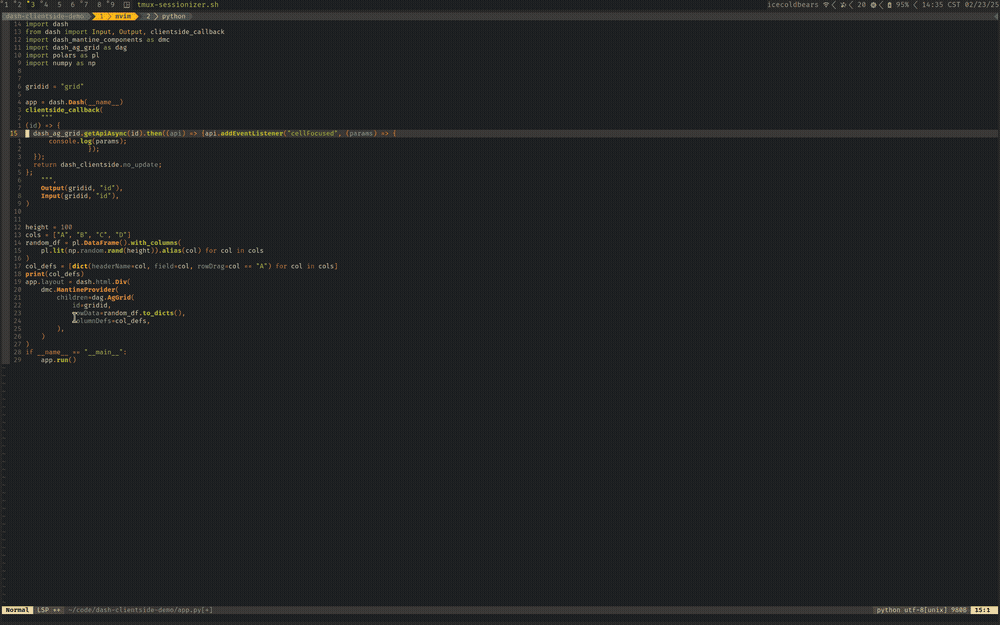
If you’ve followed my explanation so far, your editor should now be capable of something like this (note that otter is not enabled here):
Getting ts_ls Working with otter.nvim
Now that we have formatting working fairly well, it’s time to get autocomplete working on our embedded JavaScript.
For this, we turn to a plugin called [otter.nvim]. Before discussing setup, a few things to note.
First, otter works more or less by passing the captured ranges of injection.content to a hidden buffer, and then
passing the output of the LSP attached to that hidden buffer back to the current buffer.
This means that each separate capture must be syntactically valid in the injected language, so even though
callbacks of the form
function(x) {
  // do stuff to x ...
  return x;
}
evaluate to valid JavaScript once Dash gets ahold of them, they are not syntactically valid, since the function keyword expects a name for the declaration. This means that we must instead declare functions using arrow syntax, like so:
(x) => {
  // do stuff to x ...
  return x;
}
It’s too bad that the Dash documentation exclusively uses the former syntax, but it is what it is.
Second, otter has some weird behavior surrounding whitespace and indentation, and there are some
outstanding issues that may affect your experience with this plugin.
We’re working on it though! For that reason, I have pinned my otter version to the fix branch
for this issue, since it seems to work more consistently. Still not consistently enough to merge into master though.
Anyways, the configuration that I use is in lua/plugins/otter.lua:
return {
  "jmbuhr/otter.nvim",
  commit = "be6324e0987c4fab347784e602c00f17c5fc0bd7",
  -- dir = "~/code/otter.nvim",
  dependencies = { "nvim-treesitter/nvim-treesitter" },
  opts = {
    buffers = {
      set_filetype = true,
      write_to_disk = true,
    },
  },
}
You can probably get away without my opts here, but I have them set to aid in debugging.
Sometimes you’ll leave filename.py.otter.js files if things fail ungracefully, so be sure to clean those
up from your version control, or just disable writing to disk.
Finally, to activate otter, open any Python file containing a clientside_callback and run
:lua require('otter').activate()
If I’ve explained this well enough, you should now have something like the following working:
If you want otter to automatically activate in any Python file, simply add the following to after/ftplugin/python.lua:
require("otter").activate(
  { "javascript", "typescript", "js", "ts" },
  true,
  true,
)
Wrapping up
That’s pretty much it! This has been a large quality of life boost for me at work, as I work on custom row dragging logic for a table using Tree Data in a Dash app. If you find this helpful or have any suggestions for ways that I can improve this setup, please feel free to hit me up on any of my socials (github, linkedin, twitter), or just email me (it’s on my homepage).
-
If you’re wondering how I managed to get injected syntax highlighting working here, I am using a new program I’m working on called mordant. It uses
tree-sitterto wrap syntactic elements of your code block in the tags that neovim would normally wrap them in. All you need to bring is CSS, no JavaScript required! ↩